

 These hook and loop clasps are fun and easy to make.
I use round nose pliers (I have an assortment but just one is fine), wire cutters, wire, an anvil and chasing hammer.
I purchased my chasing hammer , anvil and a pair of round nose pliers from:
matsbeads on Etsy.
I purchase most of my wire from:
lannasjewelry on Etsy. (I love the 26g argentium sterling silver and the 26g 14k gold filled wire for my viking knit projects).
Both are awesome sellers. Fast shipping, great products!!
 I used 20g silver plated wire in this first project.
To make the clasp, cut 2 lengths of wire with wire cutters. The length depends on the size clasp you want. I cut the examples approximately 1 1/2", which was actually too long.

Use the round nose pliers to make a small loop at the end of one piece of wire.

Grasp the wire with the round nose pliers 1/4" or so from the loop you made, making sure you grasp it with the fatter part of the pliers. Bend the wire around the pliers in the opposite direction of the loop. Stop when the wire meets the loop.

Now grasp the wire with the round nose pliers just below the loop and bend towards the back of the hook you have made.
 Stop here and use the wire cutters to remove the excess wire.
Finish the loop with the round nose pliers.

Use the second piece of wire for the loop section of the clasp.
Grasp the wire with the round nose pliers almost in the middle of the wire. The size of the loop will be determined by the section of the round nose pliers you use.
Wrap the wire around to form a loop.
 Turn the wire around and wrap around the round nose pliers to make the second loop. Wrap the wire in the opposite direction of the first loop to form a figure 8.
 Trim off the excess wire.
The finished hook and loop clasp.

**Optional**
You may hammer the clasp to give it strength.

Hammering the pieces causes them to spread out and get a little wonky.

Just reshape and close all the openings.
 To make your clasp a little fancier, you can simply coil the wire.

Start as usual but continue to wrap the wire in a spiral.
 I make these backwards, starting at the part of the clasp that hooks to the chain.
 Wrap the wire around the round nose pliers.

Bend in the opposite direction to make the small loop which was the first step in the directions above.

Use the wire cutters to remove the excess wire. Finish the small loop with the round nose pliers.

I also make the loop backwards. Start with a coil.
 Turn the wire over and bend around the round nose pliers to finish the figure 8.
Cut off the excess wire.
 I used a very soft 18g wire in the example (very cheap craft store wire). If you use a super soft wire, it will become very flat when you hammer it.

Work it back into shape.

Here are some of the pieces I've made using the handcrafted clasp.


I made the clasp for this viking knit necklace with the spiral ends.


I also used the spiral on this viking knit bracelet.

I used 2 clasps on this viking knit rose bracelet. One hook and loop on each side of the rose.


I used the simple clasp on this bracelet.

I used viking knit pieces to display these clasps because that is what I'm hooked on right now.

Hammering the pieces causes them to spread out and get a little wonky.

Just reshape and close all the openings.
 To make your clasp a little fancier, you can simply coil the wire.
Start as usual but continue to wrap the wire in a spiral.
 I make these backwards, starting at the part of the clasp that hooks to the chain.
 Wrap the wire around the round nose pliers.
Bend in the opposite direction to make the small loop which was the first step in the directions above.

Use the wire cutters to remove the excess wire. Finish the small loop with the round nose pliers.

I also make the loop backwards. Start with a coil.
 Turn the wire over and bend around the round nose pliers to finish the figure 8.
Cut off the excess wire.
 I used a very soft 18g wire in the example (very cheap craft store wire). If you use a super soft wire, it will become very flat when you hammer it.
Work it back into shape.

Here are some of the pieces I've made using the handcrafted clasp.
I used the clasp as part of the design in this viking knit rose bracelet. I used 2 of the hooks, one on each side of the rose (there is a rose tutorial on my blog). When I wire wrapped the rose and swarovski crystals, I wrapped leaving a loop large enough for the hooks to fit through.


I made the clasp for this viking knit necklace with the spiral ends.


I also used the spiral on this viking knit bracelet.

I used 2 clasps on this viking knit rose bracelet. One hook and loop on each side of the rose.


I used the simple clasp on this bracelet.

I used viking knit pieces to display these clasps because that is what I'm hooked on right now.
Viking knit is extremely addictive!!! Perhaps I should make a viking knit tutorial???
I hope you find this tutorial useful!
Now, go make some clasps!!!!
xoxoxoxo


 This poor thing!!! Not only is he a ghost ( which can't be good ) but right after I painted on his eyes, I dropped him. Of course, he landed upside down and his eyes splatted. Hmmmm, is splatted a real word??? Anyway, I had to repair his eyes which caused them to be extremely large in the end.


 The 4 points with the burner were:
 To duplicate this project:
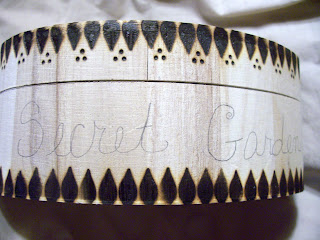


 At this point, trace, stencil or freehand a pattern around the outside center of the box. Of course this is optional.


