Monday, December 28, 2009

SECRET SANTA

I hope everyone is having a wonderful holiday!!!

I was wandering around the Etsy forums ( it's so addictive!!! ) and I came across a Secret Santa thread. A lovely Etsy seller - Jolly Jennifer organized an awesome Secret Santa gift exchange and invited everyone to join. To participate, all we had to do was comment in the thread and send her a convo to confirm our participation. Jolly Jennifer organized everything from that point, pairing up all the Secret Santas, convoing everyone, double checking to make sure everyone received a gift and even worked overtime pairing a late comer.


Several Santas thanked Jolly Jennifer for organizing such a fun gift exchange and she modestly stated it wasn't much work and she liked to organize events.

Personally, I believe it was a LOT of work and she is a wonderful, giving person!!! So...I felt the least I could do is feature her shop here. She has an amazing, diversified Etsy shop. You will have to visit it to see all of her lovely items. Here are just a few:


This very creative Upcycled Notepad:

Beautiful Purple Floral Fine Art Prints:


As you can see, Jolly Jennifer has a wonderful selection of items. You are sure to find what you want in her unique shop!!!!

------------------------------------------------------------------------------------------------

My Secret Santa was the owner of Del Guidice Studio. This shop can be described in one word: ELEGANT!!!

I want to share a few of her items before I show you my lovely gift.

There is a large selection of sleep masks like this sweet Dopo Puccini Mask:

Several silk scarves. Pictured here is the elegant La Peonia Floral:


Beautiful jewelry. Including the La Dolcetta Bracelet pictured below.

You will also find gorgeous dresses. This is the Spagnola :

Everything in the Del Guidice Studio is sweet, refined and yes, very, very elegant!!

------------------------------------------------------------------------------------------------

And...here is my gift from my Secret Santa!!!!
(I must apologize to Del Guidice Studio for the following pictures. I am horrible at photography!!)

My lovely gift came beautifully wrapped in a white box which was tied with an amazing, silky black ribbon.
When I opened the box, I was treated to a sweet card, simply lovely silver tissue paper and a wonderful little seal.
Inside the tissue paper was a gorgeous sleep mask!!!!
Thank you sooooo much Helen!!! I love my sleep mask!!!!

Playing Secret Santa with wonderful Etsy artists was such a fantastic experience! I hope Jolly Jennifer will hold another Etsy Secret Santa again next year. If she does, I hope all of you will participate!!!

xoxoxoxoxo


Friday, November 6, 2009

I WON!!!!!!!!!!!!!!!!!!!

Here is the AWESOME necklace I won!!!!


I can't believe I won another awesome giveaway!!!! I won this super cute necklace on the very wonderful and creative blog Life In Left Field. If you are not familiar with this blog, it is a MUST READ!!! Missy is funny and delightful, I recommend you follow her blog today.
Missy also has a lovely Etsy shop SYHO Customs. You must visit her shop to enjoy all of her items but I will share a few of them here:
She makes the cutest Christmas stockings I have ever seen:


SYHO Customs is full of beautiful fabric arts but that's not all you will find featured in this awesome shop.
You will find unique handcrafted jewelry, like this creative, wire wrapped necklace:

You will also find this super sweet Holiday Banner for your Etsy shop!!!!
Start your holiday shopping at SYHO Customs today!!!
Howdy Sailor is also the perfect place to start your holiday shopping!!!!
The awesome "Blogging Is Sexy" necklace I won was provided by this unique, charming Etsy shop.
Here you will find funny, unusual and fabulous jewelry.
Like this Gorgeous Brooch:


And this cute heart shaped necklace - I'll Rip Your Heart Out:

Do you love bracelets? I do!!! Especially this Fabulous Bracelet:

Howdy Sailor also offers beautiful art. This lovely Liar artwork on canvas is just one example:

Thank you for allowing me to share my awesome giveaway win!!!

Now go visit SYHO Customs and Howdy Sailor and get your Holiday shopping done!!!!

xoxoxoxo

Friday, October 16, 2009

HALLOWEEN MEMORIES

Halloween has always been one of my favorite holidays.
Who doesn't love a holiday that revolves around dressing up, candy, scary decorations, candy, pumpkins and...oh yeah, CANDY!!!!

When I was in the 5th grade, many, many years ago, my school held a Halloween Costume Contest every year.
My mom was very talented with a sewing machine and she made me a Fairy Princess costume out of beautiful old curtains. It was a beautiful long dress made lovely and full by wearing a hoop skirt beneath it. I was so proud of that BEAUTIFUL dress and it really did make me feel like a Fairy Princess. That is...before the itching started!!!!

I was participating in the Costume Parade when I started itching. The itching grew worse very quickly and then a burning sensation began. When the parade was over, I ran to my mom and told her my itchy, burning problem. She had no idea why I would be itching and burning but decided I should change right away.

When I removed my beautiful dress, my skin was a lovely shade of beet red.
It was then that my mom realized that the curtains used to make my dress had a fiberglass lining!!!!

In the end, I won the award for the Prettiest Costume :)

I miss my mom so much and would gladly wear one of her itchy, burning creations if it meant I could spend some time with her again.

MADE BY MELISSA

I love, love, love Halloween!!!
If you love Halloween as much as I do, you need to check out the awesome Halloween jewelry at

Some examples are this super cute Bat Pendant Necklace:


And this charming Purple Spider Necklace:

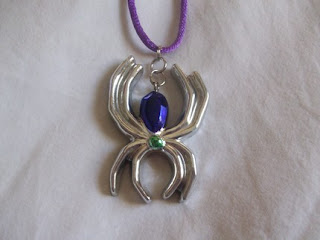
If want beautiful jewelry that is not Halloween themed, Made By Melissa has many pieces to choose from!!!


Made By Melissa also offers lovely crocheted items.

I love the colors used for this Watermelon Slice Baby / Toddler Blanket!!!


You will find vintage items in this very versatile shop too !!!

I love roses, so I had to include this Vintage Gold Rose Brooch :

Made By Melissa has 101 items for sale, you are sure to find something you are looking for !!!


Thursday, September 24, 2009

HALLOWEEN LOLLIPOP COSTUME / PIN TUTORIAL


This project would be great for a children's party. Cut out and glue the lolly costumes before the party and let each child decorate their own. If you are not having a Halloween party, change the pattern to match the party theme. Maybe a clown face, train, flower, etc.
If your child is having a Halloween party at school, you could make one of these covers for each child and personalize them by writing each child's name on the back or front with fabric paint.
The lolly costumes are inexpensive and are a quick and easy project.


What you need:
1. Felt
2. Fabric paint ( I wanted black glitter paint to decorate the edges of my pieces. I could not find black glitter paint so I substituted with glitter glue )
3. Paper ( I used plain copy paper )
4. Scissors
5. Ink pen
6. Pin backs
7. Fabric glue
8. Lollipops
To begin, lay your lollipop on the piece of paper. Make a mark at the top and sides of the lollipop. This will give you a guide for the size needed. If you are using a round lollipop, you will need to allow extra room for the lolly to fit inside the costume. In that case, allow at least 1/2" to 1" extra space when you mark around the lolly.


Draw the shape you want, using the guides you marked. I made my ghost a little smaller than my original guide because I decided to use a smaller lollipop.


Cut your shapes out. Mark one side of your pattern with a 1 and the other side with a 2. You will need to trace the back and front ( 1 & 2 ) of each shape onto the backside of the felt. Tracing the front and back of your pattern will allow you to have both sides on the right side of the felt once the project is complete.

Having said that, I must be honest, I cannot see a difference between the "front" and "back" of felt. I figure the side that has the manufactures sticker on it is the back.


Trace your pattern onto the felt. Cut around your pattern. To make these neat and clean, cut slightly inside your pen mark. Personally, for a project like this, I don't worry too much about neatness.


***** This next step is optional *****
Before gluing the front and back together, glue on the pin back. If you want to make sure the pin back will stay on the costume, sew it on. It will only take a few stitches and it will be easy if done before gluing the front and back together. Including the pin back makes the lolly costumes useful after the lollipop is gone.


Glue the front and back together with the fabric glue, making sure you glue the wrong sides together.

Now the fun begins!! Decorate your lollipop costume with fabric paint. Make them all the same or all different.


This poor thing!!! Not only is he a ghost ( which can't be good ) but right after I painted on his eyes, I dropped him. Of course, he landed upside down and his eyes splatted. Hmmmm, is splatted a real word??? Anyway, I had to repair his eyes which caused them to be extremely large in the end.


If you make these costumes in the shape of flowers, it would be cute to fill a flower pot with Styrofoam and stick the lollipop handles into the flowerpot.

The ghosts and pumpkins could be displayed in the same way by substituting the flower pot for a plastic black cauldron.


Sunday, September 20, 2009

WOODBURNING TUTORIAL

Years ago, I decided to make my daughter a wooden keepsake box. I wanted to woodburn a rose on the top of the box. My standard woodburner was doing a very poor job. I think the wood I selected for the keepsake box was too dense (or something ) for my little burner. My dad, who owns a tool store, solved the problem by purchasing an industrial woodburner for me. It was an amazing burner, it got twice as hot as a standard woodburner. It did an awesome job on the keepsake box but...it burned way too hot for other projects. I was forced to retire my super hot woodburner after I completed the keepsake box, but I am sure I will find a use for it again one day.
In the meantime, I have only used my regular woodburner for all my projects and recently, sadly, my standard woodburner burned it's last wood.
So...I thought I would use the purchase of a new woodburner as a tutorial.
This is a very satisfying craft because you are able to see your results immediately.
I purchased the woodburner at my local Michael's. It was $12.99. It came with a holder and 4 points. I also purchased, at Michael's, a pre-made wood box for $2.99.
To finish my project, I bought Minwax Wood Finish at my local hardware store for $4.89. I selected a Cherry finish but of course there are many finishes to choose from - some lighter and some darker.

****Please Note****
1. Be extremely careful, the woodburner heats to 950 degrees (510 degrees C).
2. Never, ever leave the woodburner unattended.
3. Always, always use the woodburner stand.
4. Remember, you are burning wood. There is smoke - a lot of smoke. Wear a mask if you are sensitive to smoke.
The 4 points with the burner were:
1. Shading point ( I didn't use this point for shading in this project )
2. Flow point
3. Universal point
4. Cone point

To duplicate this project:
Put the Shading point on your woodburner and turn the burner on. Once heated, press the Shading point down on the box along the bottom edge, pointy side upwards. Next, press the same Shading point along the top edge of the box, pointy side down.
( I forgot to take a picture of this first step but you can see the top and bottom edges in the picture below )


Turn the woodburner off and cool completely - please, do not burn yourself!!!! While the burner is cooling, select a stencil for the box top. I used an ivy stencil. ( I should not show you this stencil!!! I am embarrassed by the 50 layers of green stencil paint on it - uggg I should have washed it after each use ).

Please do not limit yourself to a stencil. You can freehand anything you want. You can also trace something onto the box. If you do use a stencil and you want it to look less stencily - just connect the lines where they are broken on the stencil.


The box top with the ivy stencil penciled on it - pictured below.

Do not press hard with the pencil while tracing or drawing. Woodburning is not precise like drawing on a smooth piece of paper, the burner may slip some and veer slightly off your penciled lines. Therefore, you will need to erase any visible pencil marks.If you press hard on the pencil, it will leave a permanent indention on the wood where you erase the pencil lines.


Remove the Shading point and attach the Flow point to the cooled woodburner, turn the burner on. Burn over all of your pencil lines. If you want to, you can add to or change your traced pattern, while you are woodburning. I added curly tendrils to my project.

Turn the woodburner off and cool completely. Remove the Flow point and attach the Cone point, turn the burner back on. Select areas on your project that seem a little plain and use the Cone point to add three little dots, in a triangle pattern, on those areas. Do this by placing the Cone point straight down on the wood and press slightly, it will make perfect little circles.

To decorate the top edge, use the same Cone point to make 3 dots and then a line - continue around the box. If you do not feel comfortable doing this without a guide, draw it on the box with your pencil first.

Turn the box on it's side and repeat the 3 dot triangle around the outside top edge.

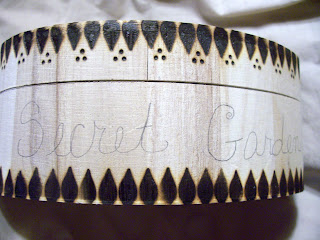
At this point, trace, stencil or freehand a pattern around the outside center of the box. Of course this is optional.

I wrote "Secret Garden" with a pencil using my own handwriting.

While the Cone point is still on the woodburner, turn the box upside down and sign it.


Turn the woodburner off and cool completely. Remove the Cone point and attach the Universal point, turn the burner on. Use the Universal point to burn the pattern (if any) along the outside center of the box.


Lastly, if you choose, stain your box. I think the stain gives the box a finished look.


A few final tips:
*You can dye your piece to make it colorful. In this case, I could have dyed the ivy leaves green. There are colored wood dyes on the market but you can also use regular clothing dye.*

*You can add a layer or 2 of clear satin or glossy finish.*

*You can embellish your piece by gluing on gems, charms, etc.*

*You can line the inside of the box if you want to.*

*You can personalize your project. If you are making it for a gift, woodburn the recipients name on it.*

*You can glue 4 wooden balls (with a flat top) or cabinet pulls to the bottom of your box to give your box a lift.*

Some of the items in my Etsy store. Stop by!!! http://www.baremoose.etsy.com