
 Years ago, I decided to make my daughter a wooden keepsake box. I wanted to woodburn a rose on the top of the box. My standard woodburner was doing a very poor job. I think the wood I selected for the keepsake box was too dense (or something ) for my little burner. My dad, who owns a tool store, solved the problem by purchasing an industrial woodburner for me. It was an amazing burner, it got twice as hot as a standard woodburner. It did an awesome job on the keepsake box but...it burned way too hot for other projects. I was forced to retire my super hot woodburner after I completed the keepsake box, but I am sure I will find a use for it again one day.
 In the meantime, I have only used my regular woodburner for all my projects and recently, sadly, my standard woodburner burned it's last wood.
So...I thought I would use the purchase of a new woodburner as a tutorial.
This is a very satisfying craft because you are able to see your results immediately.
I purchased the woodburner at my local Michael's. It was $12.99. It came with a holder and 4 points. I also purchased, at Michael's, a pre-made wood box for $2.99.
To finish my project, I bought Minwax Wood Finish at my local hardware store for $4.89. I selected a Cherry finish but of course there are many finishes to choose from - some lighter and some darker.
****Please Note****
1. Be extremely careful, the woodburner heats to 950 degrees (510 degrees C).
2. Never, ever leave the woodburner unattended.
3. Always, always use the woodburner stand.
4. Remember, you are burning wood. There is smoke - a lot of smoke. Wear a mask if you are sensitive to smoke.
 The 4 points with the burner were:
1. Shading point ( I didn't use this point for shading in this project )
2. Flow point
3. Universal point
4. Cone point
 To duplicate this project:
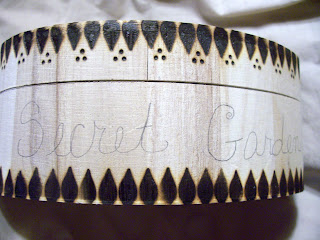
To duplicate this project:Put the Shading point on your woodburner and turn the burner on. Once heated, press the Shading point down on the box along the bottom edge, pointy side upwards. Next, press the same Shading point along the top edge of the box, pointy side down.
( I forgot to take a picture of this first step but you can see the top and bottom edges in the picture below )
Turn the woodburner off and cool completely - please, do not burn yourself!!!! While the burner is cooling, select a stencil for the box top. I used an ivy stencil. ( I should not show you this stencil!!! I am embarrassed by the 50 layers of green stencil paint on it - uggg I should have washed it after each use ).
Please do not limit yourself to a stencil. You can freehand anything you want. You can also trace something onto the box. If you do use a stencil and you want it to look less stencily - just connect the lines where they are broken on the stencil.

The box top with the ivy stencil penciled on it - pictured below.
Do not press hard with the pencil while tracing or drawing. Woodburning is not precise like drawing on a smooth piece of paper, the burner may slip some and veer slightly off your penciled lines. Therefore, you will need to erase any visible pencil marks.If you press hard on the pencil, it will leave a permanent indention on the wood where you erase the pencil lines.

Remove the Shading point and attach the Flow point to the cooled woodburner, turn the burner on. Burn over all of your pencil lines. If you want to, you can add to or change your traced pattern, while you are woodburning. I added curly tendrils to my project.

Turn the woodburner off and cool completely. Remove the Flow point and attach the Cone point, turn the burner back on. Select areas on your project that seem a little plain and use the Cone point to add three little dots, in a triangle pattern, on those areas. Do this by placing the Cone point straight down on the wood and press slightly, it will make perfect little circles.
To decorate the top edge, use the same Cone point to make 3 dots and then a line - continue around the box. If you do not feel comfortable doing this without a guide, draw it on the box with your pencil first.
Turn the box on it's side and repeat the 3 dot triangle around the outside top edge.
 At this point, trace, stencil or freehand a pattern around the outside center of the box. Of course this is optional.
I wrote "Secret Garden" with a pencil using my own handwriting.
While the Cone point is still on the woodburner, turn the box upside down and sign it.

Turn the woodburner off and cool completely. Remove the Cone point and attach the Universal point, turn the burner on. Use the Universal point to burn the pattern (if any) along the outside center of the box.

Lastly, if you choose, stain your box. I think the stain gives the box a finished look.


A few final tips:
*You can dye your piece to make it colorful. In this case, I could have dyed the ivy leaves green. There are colored wood dyes on the market but you can also use regular clothing dye.*
*You can add a layer or 2 of clear satin or glossy finish.*
*You can embellish your piece by gluing on gems, charms, etc.*
*You can line the inside of the box if you want to.*
*You can personalize your project. If you are making it for a gift, woodburn the recipients name on it.*
*You can glue 4 wooden balls (with a flat top) or cabinet pulls to the bottom of your box to give your box a lift.*

What a fascinating tutorial! My father used to do woodburning but I have never given it a a try.
ReplyDeleteYour box is beautiful!
Wonderful tutorial! I've never woodburned anything either, although I'd love to try it! Woodburners are soooo expensive here in Europe!
ReplyDelete[inkihandmade.blogspot.com]
[inkihandmade.etsy.com]
Lovely work! You've done just what I needed -- enticed me into yet another craft to try!
ReplyDeleteBeautiful!! What a great tutorial!
ReplyDeleteYour little box turned out wonderful. I have one of those wood burning tools too. (Well, actually it was a gift for my husband and he doesn't use it.) I have been wanting to do a box, and now you have given me the inspiration to try it. Thanks for sharing the tutorial.
ReplyDelete(I got one of the tools when I was a girl - guess my parents didn't think I would burn myself, and thankfully I didn't. Yes, it was a different time back then.)
Wow! you certainly put a lot of work into your lovely keepsake box! Enjoyed the tutorial!
ReplyDeleteThank you Evie !
ReplyDelete